Main elements of the user interface (when a termbase is closed)
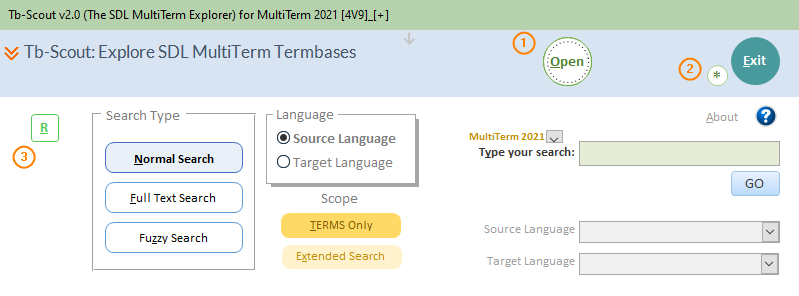
Before opening any termbase the interface has a few functional options.
- Open. Opens a dialog box to select a termbase from a Windows folder. It is also used to paste a complete path to a termbase copied from the Tb-Scout history.txt file, created in the History module (see item 3, Figure 2, below). It is also possible to open and explore a termbase located in a local network share using the Universal Naming Convention (UNC) that starts with "\\" and then <servername>, <share> and <filename>. For instance, if you have a termbase called En-Fr-Machinery.sdltb, the path may be \\servername\share\En-Fr-Machinery.sdltb. Please note it may take longer for the first time ever that you open a termbase. After that, and depending on its size, it is almost an instantaneous process.
- The asterisk button. Used to clear cache storage data.
- The R button. Used to open the History module to retrieve a dated list (from most recent to oldest) of termbases visited in the current and in previous sessions. This button, i.e. functionality, is not available in basic edition mode, or basic edition, at all.
Main elements of the user interface (when a termbase is open)
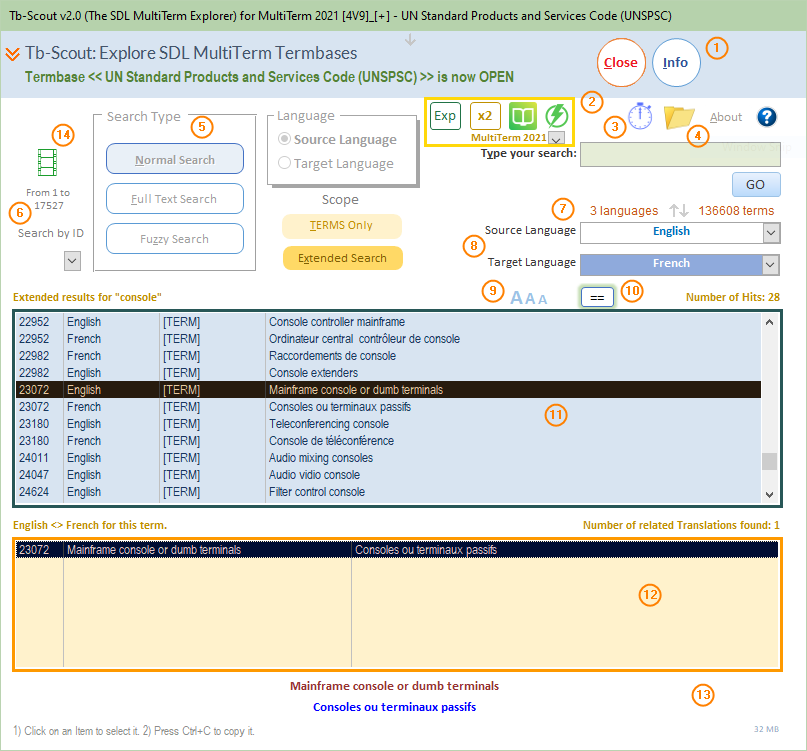
Please note that the availability of this functionality depends on the type of Tb-Scout v2.5 edition you are running.
- Information. It displays a pane with summary information about the opened termbase.
- This group of icons corresponds to five special functions (see Figure 3, below).
- Clock icon. Click on it to open a list of the latest additions (i.e. terms) to the termbase for the language pair currently selected. For instance, you can control from here, in real time, the terms being added in the Editor of SDL Trados Studio.
- Folder icon. Click on it to open the location of the opened termbase. To open the location where you installed Tb-Scout double-click on it.
- You can select here the basic search types and whether to search through the Source Language (SL) or the Target Language (TL), selected in (8). This is a "TERMS only" type of search. On the other hand, if you select "Extended search" these parameters no longer apply. "TERMS only" and "Extended search" are mutually exclusive functions.
- In this section, if you know the ID number of a particular entry ("concept"), type it in, then press Enter to open a form showing the entire entry at all levels (bird's eye view). In this section there will be an indication of the numeric range to choose from, as well.
- Readily available information about the number of languages and the number of terms, for all languages, present in the termbase. In addition, you can switch values using the opposing arrows icon ⇅, i.e. make the SL the TL, and vice versa.
- See currently selected SL and TL for the termbase being explored. The two pull-down 3-column lists will also show, for each language, its two-letter ISO 639-1 code, and the number of terms. Please note that the number of terms may be equal or bigger than the number of entries. For each entry there is always a corresponding "Concept ID", thus some entries may have the same ID, as seen in the panes (11) and (12).
- Three different font sizes for panes (11) and (12). Choose by clicking on each one of the icons.
- Icon to open a bird's eye view of the element currently selected in (11) or (12).
- Search results pane.
- Translation results pane based on the selected item in (11).
- Expanded view pane. There are two views in this section: 1) A complete view of the selected term in (12) ready to be copied and pasted somewhere else. Notice how the third column has to read "[TERM]" for this view. To select, click either SL or TL; 2) Another view corresponds to the content of a descriptive field, i.e. not a "[TERM]" which may be cut-off if it has more than 255 characters.
- Optionally, if the termbase has multimedia content, this icon will be visible. By mouse hovering over this icon you will see a list of types of multimedia files: .jpg, .mp4, .png, etc. This information will also appear in the basic termbase statistics report.
Five special Tb-Scout v2.5 functions*
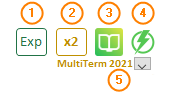
- Export module to Excel (and/or PDF) files.
- Find duplicates and repeated entries.
- Connect to SDL MultiTerm Desktop landing onto a specific search result.
- Instant search (find as you type). When this 'lightning bolt' icon is activated, click the S icon or the T icon to select source language or target language, respectively.
- Choose from the list to open a particular termbase in any installed MultiTerm Desktop version (2021, 2019, 2017, 2015, or 2014). By default, it will select the corresponding version (2021, 2019, 2017, 2015, or 2014) being used. Note: in very rare cases you may not see this list and all you need to do to restore it is to close the application and restart it.
Please note, features 3 and 5, above, are logically not available in the Tb-Scout v2.5 2000 version.
What you need to know before using Tb-Scout v2.5
- System requirements
- Trusted documents
- User interface
- Editions and licenses
- Terms and conditions
- How to get a Product License Key
Tb-Scout v2.5 is a companion terminology tool for translators who use MultiTerm and other CAT tools |
|